Thursday, February 21, 2008

A good place to stay in Kauai

The Best Western Plantation Hale, as viewed from the entrance to the property off the Kuhio highway

During our recent escape from the cold weather in Tokyo, we found a good place to stay on the Hawaiian island of Kauai. Last year, while on Kauai, we stayed at a condo in the Poipu area, but this time we wanted to stay more towards the other side of the island, so it would be easier for us to golf in Princeville.

We decided on the Best Western Plantation Hale in Kapaa. It was very reasonably priced, we got a car for a reduced rate with them too. Our room was actually a large one bedroom apartment with full kitchen. We enjoyed the jacuzzi everyday (there are 2 jacuzzis and 3 swimming pools) and a short and pleasant walk thru a field with wildflowers and birds to a beautiful long sandy beach. The ocean can be very rough here (on this day anyway, it was down right scary) and I imagine it's dangerous for swimming but the beach had a protected natural 'pool' area (an underwater reef formed a natural pool near the shore). It was great for taking a little dip.

There are also areas located near each of the pools for BBQ and picnic tables for the guests to enjoy. They have free internet connection in the rooms, though it's not wireless and you will need your own LAN cable.

From the Plantation Hale , it's a short walk to shops and a couple of restaurants at the Coconut Marketplace (literally across the driveway from the office of the property). We enjoyed a good breakfast at Eggbert's. Click here to view the shopping center's website.

For those of you who don't care for big expensive hotels, this is a great place to stay. We felt at home.

If you ever decide to try the Plantation Hale, ask for a room in a building with a balcony/terrace (called a 'lanai' in Hawaiian) that is not facing the highway. Although there is alot of foliage between the property and the highway, the units facing the highway do not have views of the pretty and well manicured grounds and you will get some highway noise that could be annoying to some (however we are talking about a highway on Kauai...not some big city). Also, there are lots of chickens roaming around (as there are everywhere on Kauai) so if you don't like the sounds they make, you'd be better off at a large hotel resort. My husband and I personally enjoyed the chickens and other many birds we saw (and heard) at this property.

Here are some pictures I took.

View of the entrance to the office

View of the road where the property sits

View from the property of the field and pathway leading to the beach

View of the property while standing the beach, looking back across the field

The beach accessed through the field

My husband is taking a dip (sitting) in the natural pool formed by a small reef

An underwater picture of a live sea snail I found near the shore in the protected 'pool' area of the beach

Some chickens and other birds enjoying the garden in the afternoon

One of the jacuzzi hot tubs we enjoyed, looks inviting doesn't it?

View of one of the BBQ areas on the property


Sunday, February 3, 2008

Daisy plays in the Tokyo snow

Well, we woke up this morning to snow! Daisy has never seen it before and boy oh boy does she like it! I let her out in the garden and at first, she walked around in the snow carefully placing her feet and lifting up a foot or two while standing and smelling it. Then she started pawing at it and eating it. She got surprised when clumps of snow would suddenly fall down from the tree. Later, when large snowflakes started coming down, she got so excited, running around trying to catch the falling snow in her mouth. Unfortunately the battery in my camera went dead and I didn't get that on video but below is some of the first video I took before the battery died.

It's a snowy but peaceful and beautiful day in Tokyo today.

Enjoy the short video....

Tuesday, January 29, 2008

Daisy's Custom Dog T-Shirt

Today I 'made' another T-shirt for Daisy. This time, we used a plain white shirt. This took just a few minutes once I planned out where to put things and warmed up the iron.

I used 4 iron on daisy/flower patches and several hot fix Swarovski rhinestones placed around here and there.

Customizing a dog T-shirt is easy and a fun way for your dog to have a unique shirt!

Daisy sat so still for these pictures! She's a real poser!


Saturday, January 26, 2008

Sucanat Banana Bread with dates and walnuts recipe

When life gives you old bananas, make banana bread!

Don't toss out your brown bananas! I never seem to be able to eat bananas fast enough after I buy them before they start getting a little too old, but that is a great time to make some banana bread. The older they are ('riper' might be a nicer word), the better flavor for the bread. Just make sure that no fruit flies have started enjoying them, in which case, they'd have to be disposed of.

The 'ripe' bananas I used today.

I have loved making banana bread since I first learned how to bake (we won't go into how many years ago that was). My husband says my banana bread is one of the things that reminds him fondly about when we were first getting to know each other (awwww, guess it's true what they say about the way to a man's heart).

These days, I use Sucanat (or Rapadura), which is organic cane sugar, instead of using white sugar. Not only does this impart a wonderful rich flavor, but also has many vitamins and minerals that white refined sugar is void of. However, in this recipe, it is possible to use regular white sugar if you wish.

So why don't you try my recipe next time you have let your bananas go!

Banana bread tips:

*Greasing only the bottom of the pan helps the loaf have a slightly rounded top.

*Beat eggs, chop fruits and/or nuts before you begin making the batter. If you stop to do something after you have mixed the batter, it can get too stiff.

*Never use an electric beater, always mix by hand and just until the ingredients are well mixed.

*Don't worry if cracks form on top the loaf while it's baking. It's normal.

*Cool loaves completely (about 2 hours) before slicing otherwise it will crumble as you try to slice it.

Banana Bread with Dates and Walnuts

1 1/4 c Sucanat or Rapadura (organic cane sugar)
1/2 cup butter softened
2 large eggs, slightly beaten
1 1/2 cups mashed very ripe bananas
1/2 cup buttermilk* (can use soy milk or cow's milk if necessary)
1 tbs. vanilla
1 1/2 cups whole wheat pastry flour
1 cup all purpose whole wheat flour
1 tsp baking soda
1 tsp salt
*optional:
1/2 tsp apple pie spice (I buy from Penzeys Spices, www.penzeys.com)
*optional:
up to 1 cup coarsely chopped walnuts (I break them into pieces by hand)
*optional:
up to 1/2 cup of chopped dates (or raisins or craisins/cranberry raisins are also good too)

Move the racks in your oven so that the bread pan will be in the center of the oven. Heat oven to 325-350 F (180-190 C) depending on your oven.

Grease the bottom only of a 9x5 inch loaf pan. I use one made by Airbake. You can make muffins instead of a loaf/bread with this recipe. Use Sili-cups or a paper lined muffin tin for muffins. You will need to reduce the baking time a bit for muffins.

In a large bowl, stir together the sugar and butter, mixing well. Stir in the eggs, mixing well. Stir in the bananas, buttermilk and vanilla, beat with a spoon until smooth.

Stir in the flours, baking soda, salt and apple pie spice. Stir just until all is moistened.

Fold in nuts and dates gently just until distributed throughout the batter.

Pour into loaf/bread pan and bake for about 1 hour (may take more than 1 hour). Check for doneness when a toothpick or butter knife inserted into the center comes out clean.

Loosen the sides of the bread from the bread pan. After about 10-15 mins or so, carefully turn the loaf out of the pan and cool on a wire rack (about 2 hours).

Slice and enjoy!

Storage:
Wrapped tightly or placed in an airtight container, the bread will keep up to 4 days at room temperature. It can be refrigerated for up to 10 days (though it never lasts that long in our house!). You may also freeze it for up to 3 months.

*About "buttermilk".....
The emulsifiers in real buttermilk makes baked good have better volume, a lighter and more uniform texture, fine crumb, golden brown crust, extended freshness and a fragrant aroma of churned buttermilk.


Most of you in USA or Europe know what buttermilk is and will be able to find it in your local supermarket. It is not sold in Japan for the average consumer. I'm told only large bakers or food producers can get it/use it in Japan. Even when fluid buttermilk is available to me, I have read that what is sold in today's dairy case, is merely cultured skim milk and contains no real buttermilk. Instead I always use a dry/powdered buttermilk that is made by Saco foods (click here to go to their website). This can be mixed with water whenever you are ready to use some and in just the amount you need at that particular time. Once opened, the container of powdered buttermilk will keep in the refrigerator for quite a long time. I've kept it for over a year before without any loss of flavor or spoilage. Saco claims on their website the shelf life can be several years when stored properly.

Here is a photo of the container it comes in below. It can be found at most supermarkets in USA. In Japan, to my knowledge and after some research, it is only available at Kinokuniya foods/supermarkets.

Wednesday, January 23, 2008

Soy Yogurt Sweet Cornbread Muffins

Today I was craving some home made biscuits or cornbread. But, not having any shortening and wanting to make something as healthy as possible, I came up with the following recipe for a sweet cornbread using soy yogurt and soy milk.

These are sweet and moist! Good served hot, sliced open (as in the photo above) with a little butter inside. Drizzle with some honey if you like!

Soy Cornbread Muffins

1/4 cup melted butter
1/2 soy milk (plain)
1/2 soy yogurt (plain)
1 large egg
1 1/4 cups yellow cornmeal
1 cup whole wheat pastry flour
5 tsp. Somersweet*(to buy, click here www.suzannesomers.com)
1 tbs. Rumford baking powder
1/2 tsp. salt
1/4 cup frozen fresh corn

Preheat the oven to 400 F (200-190 C).

In a large bowl, beat the soy yogurt, soy milk, melted butter and egg with a hand beater or whisk. Stir in the remaining ingredients until all the flour has been moistened. The batter will be lumpy.

Fill Silicone muffin cups (or paper muffin cups lining a muffin tin) about 3/4 full. These are low rising muffins. Bake for about 20 minutes, depending on your oven. Done when a knife or toothpick comes out clean.

If you want to make bread instead of muffins, grease bottom and sides of an 8 inch square pan prior to mixing the ingredients and then pour the batter into the pan and bake as directed above.

These go well with Anasazi beans with bacon (recipe in the posting prior to this)!

*If you can't get Somersweet (I believe they don't ship outside of USA) you can use 1/2 cup of sugar or any dry/non-liquid sweetner which equals the sweetness of a 1/2 cup of sugar.

Anasazi Beans with bacon and garlic

Aren't these beans beautiful? These are Anasazi beans. Anasazi beans were one of the few crops cultivated by the Anasazi Indians, who lived in U.S.A. in the four corners area (now Colorado, Utah, Arizona and New Mexico) dating back to 130 A.D. The beans were found in the ruins by settlers to the four corners area in the early 1900's. Presently the beans are grown at 7,000 ft. elevation on the same land the Anasazi inhabited. This information is courtesy the Adobe Milling website which is where you can get more information and also buy the beans, as well as other delicious products (click here www.anasazibeans.com)!

I found these beans at a market in a small town (Quartzite) in Arizona when we were there earlier this year. Finally, today I decided on a way to use them. Here is my recipe.

Garlic Anasazi beans with slab bacon and onions

1 cup Anasazi beans
3 cups water (distilled is best)
1/3 of a slab/block of smoked bacon (sliced, then cut into small pieces)
1 small onion
1 large clove of garlic, crushed
1 tsp. salt
1/4 tsp. white pepper
1/2 cup water, if desired (for last portion of cooking)

Place the beans in a dutch oven and add the water. Simmer on a very low heat for an hour (until beans have become firm but not hard).

One cup of dried beans with 3 cups of water.

While the beans are simmering, slice up the bacon and place it on paper towels (which are on a large microwave safe plate). I used an apple smoked bacon. Cover the paper towels with bacon pieces then add one paper towel to cover the bacon. Microwave for 2 minutes on 500 W power. I like my bacon alittle well done so I microwaved it for an addition 1 minute and 20 seconds.

Bacon on paper towels, after microwaving.

Cut the onion into cubes. Cut the bacon pieces into smaller bite sized pieces.

After the beans have simmered for approximately one hour, check the firmness by taking one out and biting it in half. If the beans still seem alittle too tough, simmer for a little while longer, paying attention to check again soon. When it is ready, crush the garlic directly in to the pot with the beans. Then add the bacon, onions, salt and pepper. Cover and simmer on lowest heat for another 30 minutes, stirring occasionally.

After about 40 minutes of simmering, there is still a good amount of water left to cook down.

After alittle over one hour of simmering, the water has nearly gone. This is just before adding the bacon and other ingredients.

Check occasionally for doneness. You may want or need to add an additional 1/2 cup of water during this last 30 minutes of cooking (I did). When the beans have reached the level of doneness (become soft) that you like, they're done!

Maybe next time I make this I will mix in some canned diced Ortega (mild green) chilies for a little color variation and light flavor. Or maybe a bit of Tabasco mild green sauce would taste good. What ideas will you have?

Finished beans, served up and ready to eat!

Daisy was passed out on the sofa all the while I was cooking tonight! She has been so lazy today! Looks pretty cozy doesn't she?


Saturday, January 12, 2008

Daisy's Rock n Roll dog T-Shirt

Daisy loves Led Zeppelin! Just like her Mommy.... She was jealous of my orange Zepp T-shirt, so I made a custom Led Zeppelin dog T-shirt for her. It's different from my vintage shirt, but I like hers better I think! Got sparkles!

'We' (ok just me actually) recently got into the Led Zeppelin 'mood' after dreaming about how we might be able to manage to get ourselves a seat at their one time reunion concert last month (Dec 10th) in London at the at the O2 Arena. They played a one time show in memorial for their recently passed away friend, Ahmet Ertegun,
with Jason Bonham drumming in place of his father. But alas, a dream was all it was. We are anxiously waiting to hear if Led Zeppelin will play some other shows in the future for us sorry losers who couldn't see the show in London. Over 13 million people entered their names on the website for the lottery for tickets to the London show (initially crashing the website!), but there were only 20,000 seats available.

You can make a custom rock and roll dog T-shirt for your dog too (or any other theme you like)! You will need one plain dog T-shirt to start with. We used orange for Daisy's Zeppelin shirt since the Zeppelin logo I was going to use was coming from a shirt that was also orange.

Next, you need a patch or use a cutting from an old T-shirt with the logo or wording or picture you want to put onto the dog's T-shirt. I cut the words/logo "Led Zeppelin" from a T-shirt of mine, as mentioned above. Of course the T-shirt I cut it from is no longer usable by me, so keep in mind you are sacrificing one T-shirt for the dog T-shirt if you are going to cut a logo or picture instead of using a patch.

This is really all you will need, sewing the patch or cutting onto the plain dog T-shirt (after determining where you like to place it on the T-shirt it). Sew first one straight stitch on top of the patch/cutting all the way around (about 0.5 cm or 1/4 inch in from the edge) attaching securely to the dog T-shirt. Then go back and sew a zig-zag stitch along the entire edge of the patch or cutting so that it won't roll up along the edge after washing (this is especially important when using a cutting from a T-shirt).

Being the over-doer that I am, I was not content to stop here, I wanted something more. Originally I thought to use some silver studs for that rock and roll look but then remembered I had some even more interesting crystal studs in my sewing basket and got those out. I think plain silver studs would be good for a boy dog and the crystals are pretty for a girl, like my Miss Daisy!

If you are going to decorate with studs or rhinestones, after sewing on the logo, lay the shirt out flat and plan out where you want to place the decorations before starting to attach them one by one. I didn't measure, just eyeballed it and it turned out fine.

We may be making more T-shirts in the future!

Click on the pictures to enlarge to see detailing closer.

Rear view of the finished shirt.

Decided to bring some crystal studs around on the front too.

Miss Daisy Ipo in another pose in her new shirt.

Saturday, January 5, 2008

Have you heard of Wii Fit?

Menu for the different muscle conditioning exercises.

What is Wii Fit? It's a new addition to Nintendo's Wii games. You may have heard about it. It was released this past December in Japan. It is hard to get though, as it is sold out as soon as the store gets it in. A few weeks ago, my father in law found out when a local store had just received a shipment. He stood in line about an hour before they opened and he was able to get one. It costs 8,000 Yen in Japan which is currently about $75.00 USD.

We are visiting with my in laws for a week right now and are enjoying playing around with Fit. I usually dislike gaming, mostly to do with the time it wastes and the negative content of many of the games, but I really think that Nintendo has done something great with Wii. This is enjoyable not only for those who have never really been into gaming, but also now the whole family can get involved. I think Wii games are good mental exercise (the basic ones I have seen) and now with Wii Fit, you can get a bit of physical exercise too, especially for older folks who may find other gaming systems difficult.

I have tried some Wii games earlier this year at a friend's house and I liked it (Wii Sports was fun), but now I am really motivated to get Wii Fit when it comes out in US (since I don't really read Japanese well, I need to be able to operate it in English).

I have heard that Fit was supposed to be released in early January 2008 in US, but then read some other comments on the internet that it will be available much later than that. Release dates for Australia seem yet to be announced as well. I'm sure it will sell out quick in the English language verison whenever it becomes available. Some places may be pre-selling it seems.

Fit has more than 40 different types of training activities designed for all ages/members of the family. There are four fitness categories including aerobic exercise, muscle conditioning, yoga poses, and balance games. The aerobic exercise consists of 10-minute exercises that are designed to get the heart pumping. The muscle conditioning is done by controlling your motions using arms, legs and other body parts. Yoga Poses uses classic poses that focus on balance and stretching. Some of the balance games are ski jumping and heading soccer balls, that challenge the player’s overall body balance. Lean to block soccer balls, swivel hips to power hoop twirls or balance to hold the perfect yoga pose. When you stand on the Fit's balance board, your body’s overall balance is tied to the game.

The Wii Fit's balance board can also be used for daily tests. These evaluate two key measures that a household can track via progress charts:

• Body Mass Index (BMI): A weight evaluation based on a ratio of weight to height.
• Wii Fit Age: The Wii Fit Age is measured by factoring the user’s BMI reading, testing the user’s center of gravity and conducting quick balance tests.

My father in law is 82 and has no problems with the games or operating the Wii internet functions and photo viewing. We only had to help him get the wireless router necessary for the internet connection (for the Wii itself). My niece and nephew (10 and 12 years old respectively) were monopolizing the system on New Year's day when we all got together. They tried out all the games for us and then gave us pointers.

Here are some pictures and some of the Wii Fit different games we have been enjoying.

The Wii Fit balance board.

The balance board with someone standing on to show size.

Ken enjoying the snowboarding game, for this, the Wii Fit balance
board is turned lengthwise.

The Yoga menu.

Menu for the balance games, soccer balls, downhill skiing,
ski jump, tightrope walking, etc.

Downhill ski racing game.

I don't know what this one is called, but it's pretty fun. Tilt the different shaped trays (this one is a "W" shape) and make the balls fall into the hole within the allotted time period.

Tilt the iceberg to get points with the penguin and jumping fishes.


Thursday, December 27, 2007

Zucchini and Sweet Potato Muffins (or Bread)

Last week I got a big box of Zucchini from Costco, so I decided to make some Zucchini Bread. However, for a change, I wanted to find a recipe alittle more interesting than the usual basic Zucchini bread I make (although it is very good). I checked the internet and found a Sweet Potato and Zucchini Bread recipe on the Epicurious website. I made a few changes to make it alittle healthier, so here is my verison below.

Zucchini and Sweet Potato Muffins or Bread

1 c. Unbleached White Flour
1 c. Whole Wheat Pastry Flour
2 tsp. ground Cinnamon (I used Cassia cinnamon from Vietnam)
1 tsp. Baking Soda
1/4 tsp. Rumford Baking powder
1/4 tsp. Salt
1 1/2 c. Sucanat, or Rapadura (organic cane sugar)
1/2 c. applesauce (natural, no sugar added)
1/4 c. vegetable oil
3 large eggs
1 tsp. Vanilla extract
1 1/2 c. grated Zucchini (about 1 and 1/2 medium sized zucchini)
1 1/2 c. grated Sweet Potato (I used a Japanese variety, as shown in the photo below)
1 c. lightly toasted, chopped Walnuts

Preheat oven to 350 F / 180 C. If using a bread pan, butter and flour it (about 9x5x3 size). For muffins, line muffin tin with muffin papers or use reusable silicon baking cups as I did. Place the "Sili-Cups" on a cookie sheet.

Sift dry ingredients (the first 5 ingredients listed, do not mix in the sugar (Sucanat/Rapadura) yet). I split into two basically equal parts when measuring and then sifted each half together into one large bowl. It is important to sift the dry ingredients well so that you do not end up with unbaked lumps of flour in the finished product.

Beat eggs in a small bowl. Measure sugar, applesauce, oil and vanilla and put into a large bowl. Stir in the eggs into the large bowl and mix thouroughly with the sugar, applesauce, oil and vanilla. Add in the zucchini and sweet potato until mixed completely. Lastly, add in dry ingredients mixture about half at a time, mixing until wet the first addition, then just mixing until wet the addition of the second half. DO NOT OVER MIX. Fold in the walnuts just until evenly mixed.

Fill the muffin cups or papers to no more than 3/4 full. During baking, these rise abit but not alot. If making bread instead of muffins, put the batter into the prepared bread pan. I like to use an AirBake bread pan so that I never get burnt edges.

This recipe filled 12 Sili-Cups and then I had batter left over to also fill about 1/3 to 1/2 of a bread pan as well. I baked everything at the same time, by placing the Sili-Cups around the bread pan that was centered on the cookie sheet.

Bake for about 25 minutes for muffins. Full bread pan will take about double the baking time. My partially filled bread pan finished baking at the same time as the muffins. You can check muffins or the bread for doneness by inserting a clean knife or bamboo skewer. If it comes out clean, it's done!

Japanese Sweet Potato

Top left to right: Beaten eggs, shredded zucchini and sweet potato, mixed dry ingredients, toasted chopped walnuts and lg. bowl with sugar, applesauce, oil and vanilla. Shown here just before the final mixing together.

"Sili-Cups" (re-usable silicon baking cups)
ready for filling. I bought mine at Williams-Sonoma.

Close up of finished muffins...they're really good!


Saturday, December 22, 2007

Ramen in Matsudo City - Tonikaku's new location - 松戸市のラーメン  移転した「兎に角」

Tonikaku (兎に角)の外観

Previously I have posted information on Tsuke-men at two restaurants in Matsudo City. Yesterday Ken and I went back to Tonikaku (which translates to "Anyhow" in English) and since it was pretty cold outside, we decided to have the ramen to try to warm ourselves up.

We discovered that Tonikaku has moved two streets over from it's previous location. It's now on a corner of a street that is closer to the train tracks and much is larger inside, seating about double the amount of customers than before. There is a considerable foyer/entry area where a few waiting customers can line up, instead of everyone having to stand outside in the street. Very nice on a cold day like yesterday. They were still playing 'oldies' music (Bee-Gees etc. on this particular day) but I noticed there was a mix of Japanese and English tunes this time.

There are at least 4 paid self parking areas within a 2-3 minute walk of the restaurant that we were able to see without even looking for it.

Their hours of operation are still 11:30 am to 2:00 pm and 6:30 pm to 9:00 pm every day except Monday (closed on Mondays) and open only for lunch from 11:30 am to 2:00 pm on Sundays, Thursdays and holidays. The NEW address is:

Nemoto 462, 1st floor
Matsudo-City
phone 047-361-4667

The soup in their ramen was quite delicious! Not fatty but not too thin. We noticed the noodles were more spaghetti like than the typical or expected ramen noodles. They were also very good.


Don't get too hungry looking at the pictures!

Basic ramen

Close up of the soup

Char-shu Men

Monday, December 3, 2007

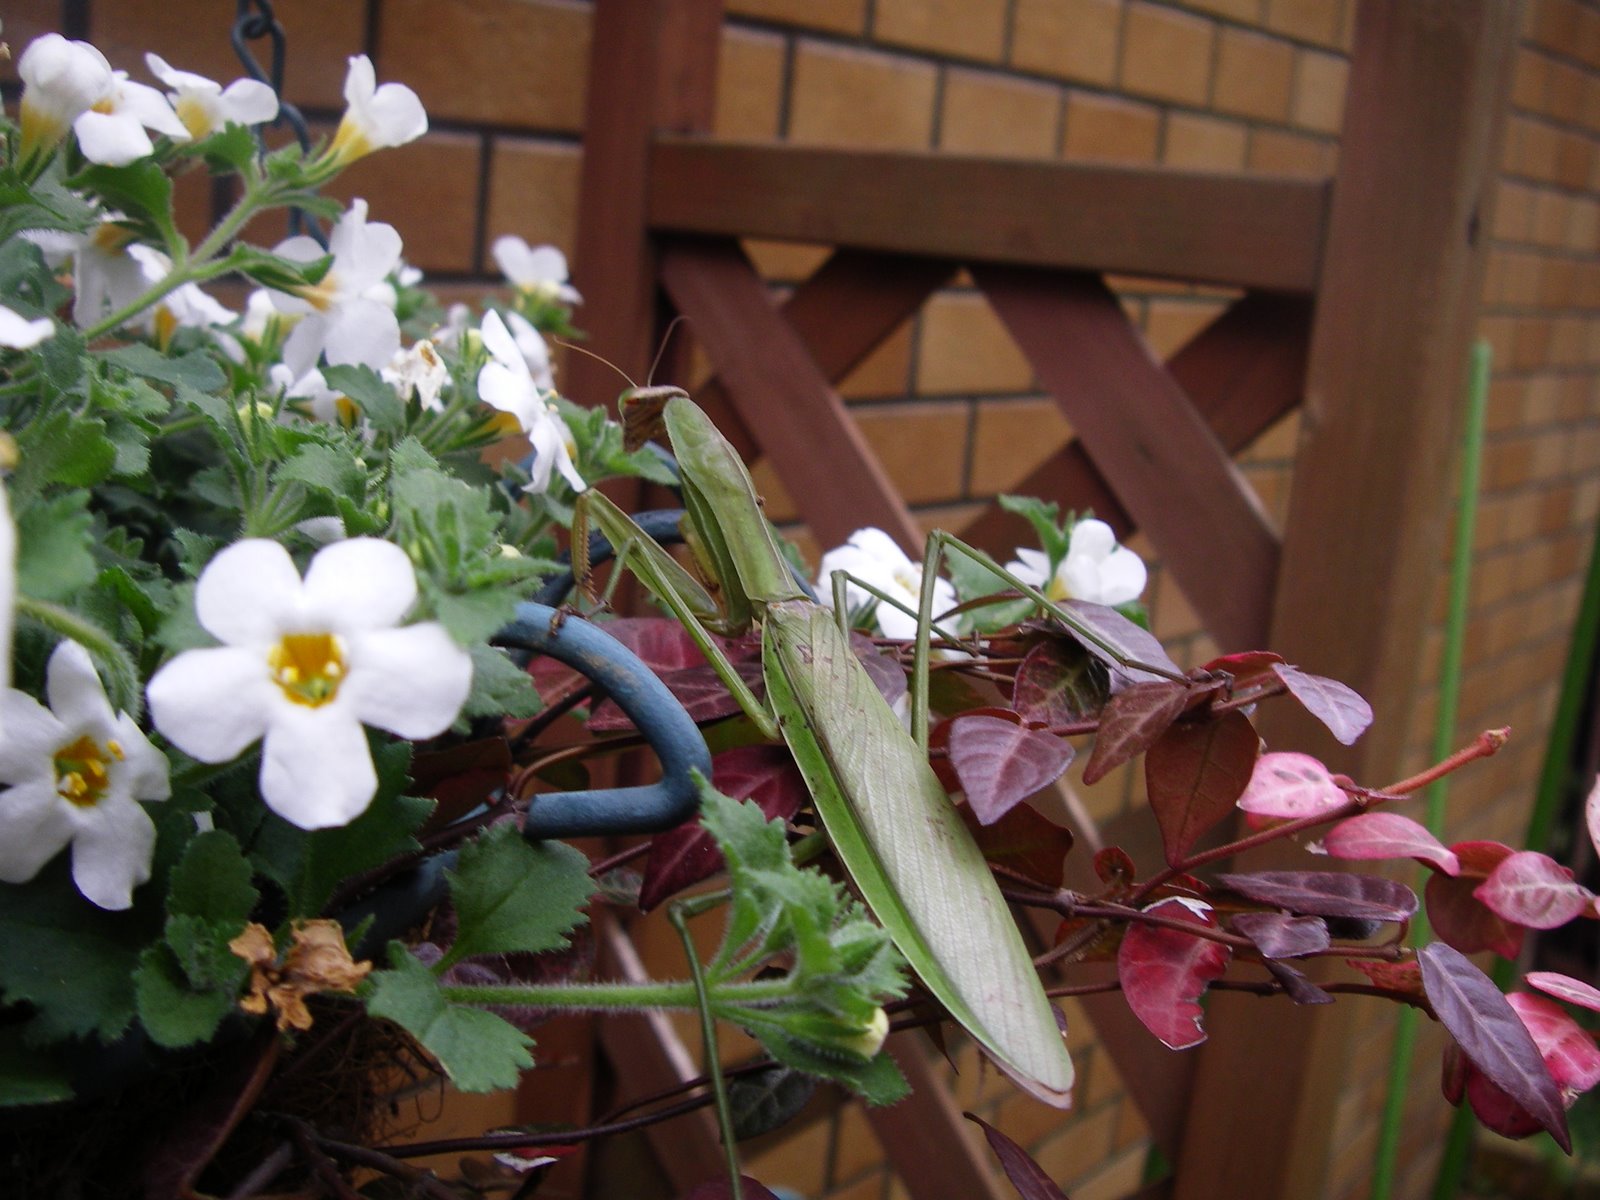
A Japanese Giant Mantis - 大かまきり 

The rescued Mantis on our hanging flower basket

Daisy has discovered in our garden this past week (on November 18th), a Japanese Giant Mantis, which I suppose is the Japanese version of what is called a Praying Mantis in America. She sniffed it out and picked it up in her mouth, perhaps thinking it would make a good thing to play with, since everything is 'funny' to Daisy. I quickly noticed she had something new and of great interest, as she was proudly trotting around the garden like she had just discovered a treasure. Thankfully she was carrying it gingerly in her mouth. So I ran over to her and rescued the poor creature.

We have a little hanging basket of flowers that usually has some little bee or butterfly buzzing around it so I put the Mantis there. All week it has been staying on the basket, moving around I imagine getting something to eat. We have had nice sunny days for about a week now, with temps around mid to high 60's (that's Fahrenheit, which is about 14-16 C). Normally I don't think that we would see a Mantis in the garden this time of year.

I checked one of my favorite blogs that has info on nature in Japan and found that the man who writes that blog also found a Giant Mantis on Nov 25th, although where he is located in Japan it tends to be a bit warmer than where we are (click here natural-japan.net, or see sidebar link, under "My Favorite Web places").

Wonder how long this one will make it into winter. Temps are supposed to 'plunge' from today we heard on the news last night.....We will keep an eye on it (I think it's a 'she').

If looking at 'bugs' close up doesn't bother you, click on the photos to enlarge!

The Mantis a few days after it's rescue, watching some little bees flying around the flowers.

The Mantis today, Dec 3rd. Seems it is trying to stay dry and out of the rain today, hanging on the underside of the basket.

UPDATE: Dec. 5th; The Mantis was found dead today, not surprisingly since it's been very cold at night now. Hopefully we will find some of it's offspring in the garden when the weather warms up in a few months.